The oven door cracks open and a cloud of warm, sugary steam rolls out like a memory. Little hands press against the counter to watch as golden edges set and the top puffs just a touch. I reach in, lift the pan, and the house fills with a smell that stops time for a moment: butter, vanilla, and home. That is how these Sugar Cookie Bars begin to feel like something we pass around, not just a recipe.
Why Sugar Cookie Bars Still Feels Like Home
This recipe has a small, gentle history in our kitchen. I first mixed these bars on a rainy afternoon when the kids were home from school and needed something to do with their hands and their worrying minds. The dough came together quick, soft enough that they could press it into the pan without fuss. We iced the bars with messy hands and laughed at the sprinkles that jumped off the knife. Those are the moments that root a recipe in family life.
Sugar Cookie Bars matter because they are both simple and generous. They do not demand a perfect crust or hours of rolling. They ask for a bowl, a wooden spoon, and a few familiar ingredients. They reward you with a tender crumb that tastes like a bakery but carries the gentle unevenness of a real family batch. That imperfection is what makes them warm.
Over time, these bars became a way to mark small seasons. We bring them to birthday breakfasts, tuck them into lunchboxes, and set a pan on the counter at garden club. They are the kind of dessert that makes guests feel welcome without fuss. They are easy to make, and they forgive small slips, which is a kindness a home cook learns to love.
If you want comfort that is quick, these bars answer. If you want a canvas to decorate with kids, they brighten any afternoon. If you want something that carries the smell of butter and vanilla through your house, make a pan. It will sit in the middle of the table and invite conversation.
The Story Behind Our Favorite Sugar Cookie Bars
There is a memory that keeps returning when I make these bars. It is of my mother handing me a butter knife while she spread frosting across a square of cookie dough. She never worried about straight lines or piping tips. She cared about the way the frosting melted a little into the warm cookie and the way sprinkles made everything look like a small celebration.
We have kept that spirit. When I make these bars now, I think of that butter knife and the way a child’s grin makes even the simplest treat feel enormous. Sometimes I make them plain, letting the cookie speak for itself. Other times I pull out all the colors and let the kids go to town. Both ways bring the same thing: a sense of belonging.
These bars are also a lesson in patience and in small rewards. The dough is forgiving. The wait for the edges to turn that soft golden color is a quiet watch that teaches you to breathe. When you finally cut into them, you will find a texture that is tender at the center and slightly crisp at the edge. It is a texture that says you did something good for the people you love.
Print
Sugar Cookie Bars
- Total Time: 25 minutes
- Yield: 16 servings 1x
- Diet: Vegetarian
Description
Delicious and tender sugar cookie bars topped with frosting, perfect for any occasion.
Ingredients
- 2 3/4 cups all-purpose flour
- 1 teaspoon baking soda
- 1/2 teaspoon baking powder
- 1 cup unsalted butter, softened
- 1 1/2 cups white sugar
- 1 egg
- 1 teaspoon vanilla extract
- 1/2 teaspoon almond extract
- 1/4 teaspoon salt
- Frosting (optional, to taste)
- Sprinkles (optional, for topping)
Instructions
- Preheat the oven to 375°F (190°C). Grease a cutting board or line a 9×13 inch baking pan with parchment paper.
- Cream together the butter and sugar until smooth. Beat in the egg, vanilla extract, and almond extract.
- Gradually blend in the flour, baking soda, baking powder, and salt.
- Spread the dough evenly into the prepared baking pan.
- Bake for 8 to 10 minutes in the preheated oven until the edges are lightly golden.
- Allow to cool completely before frosting with your favorite frosting and adding sprinkles.
- Cut into bars and serve.
Notes
These cookie bars are forgiving and can be made ahead of time. They also freeze well; thaw before serving.
- Prep Time: 15 minutes
- Cook Time: 10 minutes
- Category: Dessert
- Method: Baking
- Cuisine: American
Nutrition
- Serving Size: 1 bar
- Calories: 200
- Sugar: 10g
- Sodium: 150mg
- Fat: 8g
- Saturated Fat: 5g
- Unsaturated Fat: 2g
- Trans Fat: 0g
- Carbohydrates: 30g
- Fiber: 1g
- Protein: 2g
- Cholesterol: 30mg
How to Make Sugar Cookie Bars
“Every time I stir this pot, it smells just like Sunday at home.”
Making these Sugar Cookie Bars is like taking the rhythm of an old song and humming it through new words. First you gather the familiar ingredients and set out a pan. The butter is soft and pale. The sugar sparkles in the bowl. When you cream them together, the mixture grows glossy and light. That is the first note.
From there you fold in the egg and the small, fragrant touches of vanilla and almond. The batter becomes smooth and a little silkier than you expect. You can hear the faint scrape of the wooden spoon against the bowl. The flour gets folded in, and the dough comes together in a soft, even mass that spreads easily under the back of a spoon.
When you press it into the pan, press with patient hands. Smooth the surface, and notice the way light catches the little dimples your spatula leaves. The oven will do the rest. Eight to ten minutes will transform a soft, shy dough into a sheet of warm, tender cookie with edges that catch color first. Once it cools and you frost it, each cut becomes a small gift.
The act of making these bars is not a race. It is a series of small, steady steps that let you breathe and listen to the house. The timer is there to guide you, not to rush you. And when you pull that pan from the oven, hold it like a warm story. Let the scent fill the room. That is how this recipe becomes part of home.
Ingredients You’ll Need
2 3/4 cups all-purpose flour
1 teaspoon baking soda
1/2 teaspoon baking powder
1 cup unsalted butter, softened (fresh butter gives this its richness)
1 1/2 cups white sugar
1 egg
1 teaspoon vanilla extract (a little extra vanilla if you love a cozy aroma)
1/2 teaspoon almond extract
1/4 teaspoon salt
Frosting (optional, to taste) (cream cheese or vanilla frosting both feel right)
Sprinkles (optional, for topping) (use rainbow sprinkles for a playful touch)
Each ingredient here is simple and honest. The flour is the base, the butter is the heart, and the sugar brings the cheer. The extracts add that small layered note that turns plain sweetness into a memory. Do not skip the pinch of salt. It does quiet magic by balancing the flavors.
If you want to swap things, you can. Try a bit more vanilla and skip the almond for a pure vanilla profile. Or add a teaspoon of lemon zest for a fresh turn. The recipe is steady and kind enough to hold small experiments.
Step-by-Step Directions
Preheat the oven to 375°F (190°C). Grease a cutting board or line a 9×13 inch baking pan with parchment paper. Place the pan on the middle rack so heat wraps the dough evenly and the edges brown gently. This first step sets the stage.
In a bowl, cream together the butter and sugar until smooth. Beat in the egg, vanilla extract, and almond extract. Stir until glossy and light, and breathe in that warm, sweet aroma that fills the kitchen. The mixture should look soft and slightly fluffy.
Gradually blend in the flour, baking soda, baking powder, and salt. Mix just until the dough comes together. You will see it change from loose crumbs to a soft, even dough that holds together when pressed. Stop when it is uniform.
Spread the dough evenly into the prepared baking pan. Use the back of a spatula to smooth the top so it is even. The dough will be thick but easy to spread. Notice the small indentations the spatula leaves and smooth them gently.
Bake for 8 to 10 minutes in the preheated oven. The edges should be lightly golden. Watch closely near the end so you do not overbake. The center will still look slightly soft, and that is okay. Wait for the faint golden touch at the edge.
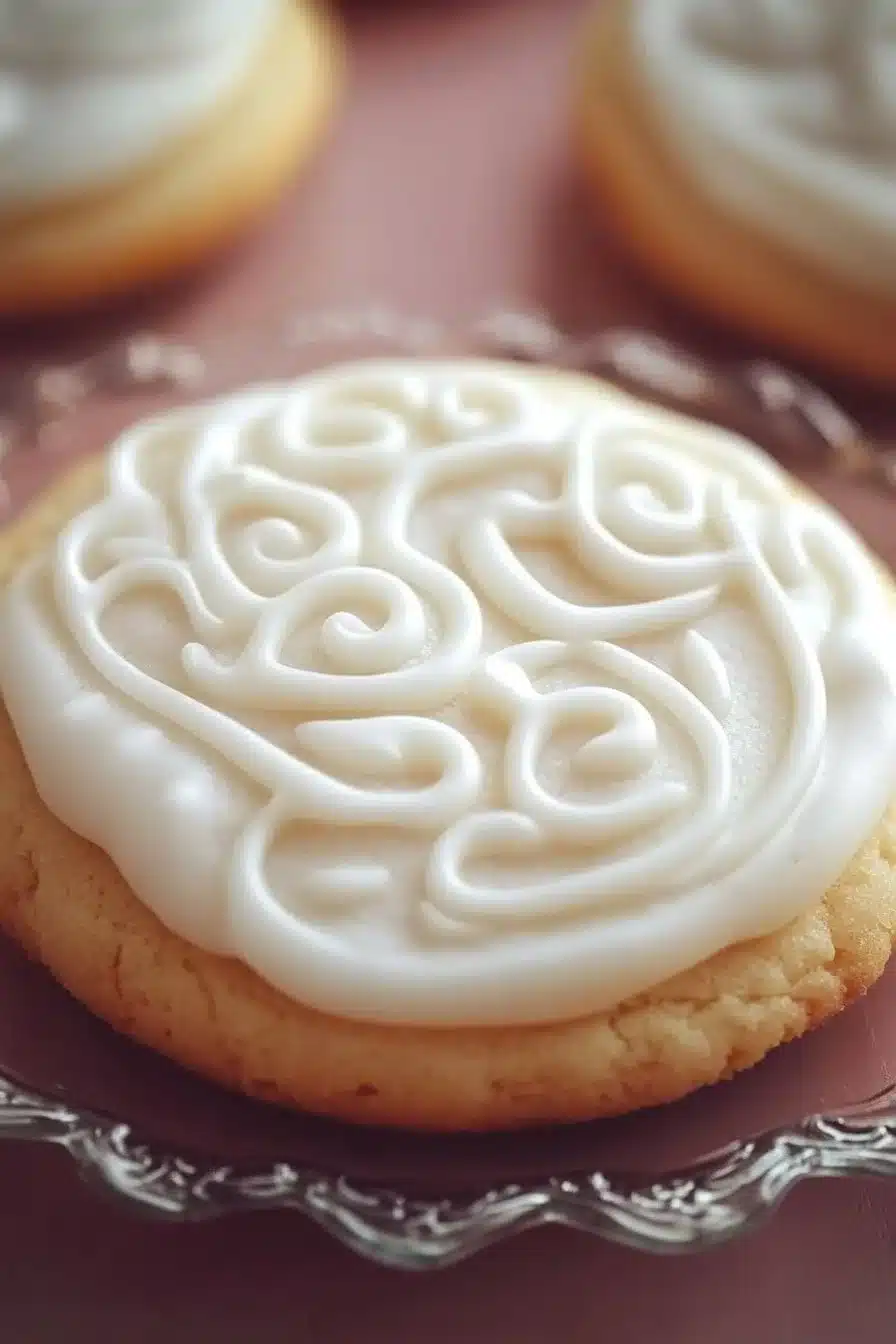
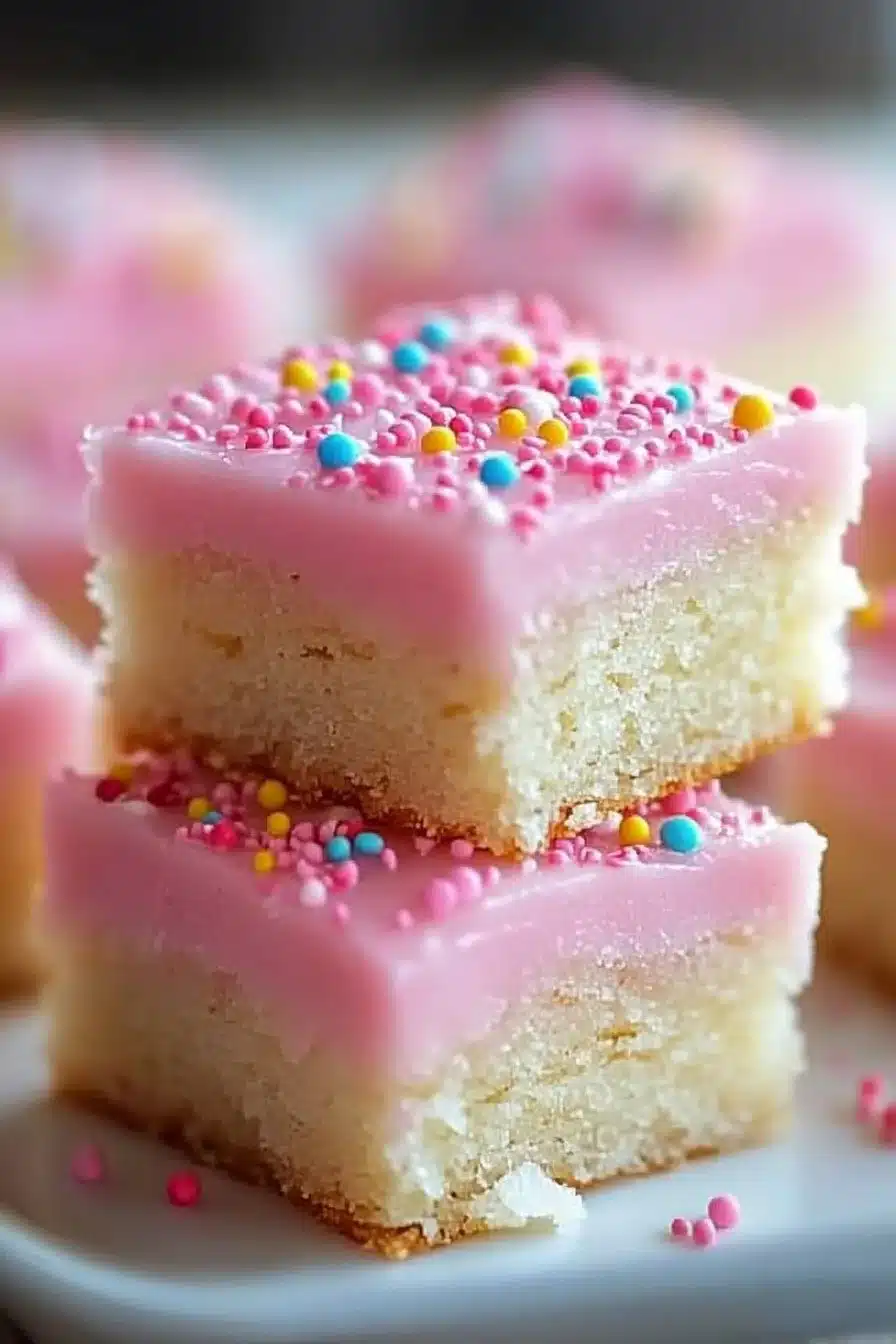
Allow to cool completely before frosting with your favorite frosting. Once cooled, the bars will be firm enough to cut without crumbs that fall apart. Spread frosting in an even layer and add sprinkles while the frosting is soft so they stick and shine.
Cut into bars and serve. Use a sharp knife warmed in hot water for neat edges, wiping the blade between cuts if you like tidy lines. Watch how the frosting holds, how the crumb stays tender, and how a little square carries a whole afternoon.

Bringing Sugar Cookie Bars to the Table
There is something generous about setting a pan of these bars in the center of a table. They are not fussy. You can pile them on a simple plate or line them on a wooden board for a more rustic look. I like to make a small stack for each guest and tuck a napkin beside it. They pair beautifully with a cup of tea or a tall glass of milk.
For a weekend brunch, I serve them with fresh fruit to balance the sweetness. Strawberries, sliced pears, or a bowl of mixed berries bring a bright contrast. If you bring these bars to a potluck, frost them boldly and add a sprinkle crown. People will circle them first.
At home, there is a small ritual we have developed. When a pan finishes cooling, one child chooses the first piece and the other chooses the frosting method. Sometimes we do stripes of chocolate and vanilla. Sometimes we leave them plain to taste the rich butter. Those small choices make a pan feel like a living thing in our house.
If you take them to a picnic, wrap them loosely in parchment and tuck them into a basket. They travel well and remain tender for a few hours. If you are gifting a pan to a neighbor, stack the bars in a tin and leave a note. It is a way to say hello without words.
How We Enjoy Sugar Cookie Bars at Home
On a rainy Saturday, these bars sit beside puzzles and a mug of cocoa. The house slows down and the bars become part of a soft, easy day. On school mornings we sometimes cut tiny squares for a lunchbox treat. The kids think it is a surprise and I think it is a small kindness that keeps the day gentle.
We also use them for little celebrations. A new tooth, a lost tooth, a music recital. Each small achievement deserves a small ritual, and these bars are perfectly suited. I cut them into stars with a cookie cutter sometimes and let the kids add sprinkles. The cookies wear the decorations like small medals.
There are evenings when I bring a single bar to the couch and set it on a saucer with a cup of tea. It is a quiet way to end the day. The kitchen has done its work, and the bars are the soft punctuation that tells the family a day has come to rest.
Keeping It Real: Variations and Small Changes
If you like a bit more chew, press the dough a little thinner in the pan and watch the edges brown faster. For a more tender bite, use a touch less flour or add a tablespoon of sour cream to the batter. If you love almond flavor, add a touch more almond extract, but be careful: a little goes a long way.
You can also fold in a handful of finely chopped nuts or white chocolate chips for texture. For a seasonal twist, add a teaspoon of cinnamon or a tablespoon of grated orange zest. These little changes nudge the recipe into new moods without changing its heart.
For a gluten-free option, substitute a 1:1 gluten-free flour blend that contains xanthan gum. The dough will behave slightly differently, but the result can still be tender and sweet. Keep an eye on the bake time; gluten-free flours sometimes bake faster at the edges.
Storing Sugar Cookie Bars for Tomorrow
These bars stay tender for a few days when stored right. Place them in an airtight container at room temperature for up to three days. If you have frosting on them, a shallow container works best so the frosting does not get smooshed. A little parchment between layers keeps them neat.
To keep them a bit longer, you can refrigerate them for up to a week. Let them come to room temperature before serving so the texture softens and the flavors bloom. The frosting may firm slightly in the fridge, but that can be charming in its own way.
If you want to freeze them, cut the cooled bars into squares and flash freeze them on a tray until firm. Once frozen, stack them with parchment between layers and place them in a freezer-safe container. They will keep for up to two months. Thaw in the refrigerator overnight and bring to room temperature before serving. The flavor often deepens in the freezer, and the bars can taste even more buttery after thawing.
For reheating, warm a single bar in the microwave for 10 to 15 seconds to revive that freshly baked feel. If you want a slight crisp at the edge, warm a bar in a 325°F oven for 5 minutes, watching so the frosting does not melt away. These small steps make leftovers feel like new.
How to Make These Bars Ahead
If you know you will be busy, make the dough a day ahead and keep it wrapped in the fridge. Press it into the pan right before baking. Chilled dough may need an extra minute in the oven, so keep a close eye. The benefit is that the flavors have a little time to marry.
You can also bake the bars a day before serving and store them unfrosted. Add the frosting and sprinkles the morning of your gathering. That way you keep the look fresh and the frosting soft. It takes just a few minutes and looks like you worked longer on it.
For gatherings, double the recipe and bake in two pans so you can share more freely. I often make one plain and one with frosting so guests can choose. It feels thoughtful without being complicated.
Small Tips from My Kitchen
- Use room temperature butter for the creamiest texture. It blends evenly and helps create that soft crumb.
- Warm your knife under hot water and dry it between cuts for cleaner pieces. This keeps the frosting neat and reduces crumbs.
- If you love almond, add a tiny extra drop of almond extract. Be careful; it is potent. A little goes a long way.
- When frosting, work quickly while the bars are cool but not icy. Frosting spreads smoothly and picks up a delicate sheen.
- If kids are helping, give them a shallow bowl of sprinkles and a butter knife. Let them sprinkle with gentle hands for the happiest results.
A Few Thoughts on Frosting and Decoration
Frosting is optional, but it changes the mood of the bars. A simple vanilla buttercream keeps things bright and sweet. A cream cheese frosting adds a tang that plays well with the buttery cookie. If you want something light, dust the top with powdered sugar and skip the heavier spread.
Decorating is part of the ritual. A smattering of sprinkles feels festive and makes children’s eyes light up. If you prefer something grown-up, try a scatter of finely chopped pistachios or a thin drizzle of melted dark chocolate. Both add texture and a note of contrast.
I often let my kids choose the decoration pattern. One of them likes polka dots, the other prefers stripes. The results are rarely symmetrical, and they are always charming. The imperfect look is part of the joy.
Teaching Moments in the Kitchen
Making Sugar Cookie Bars with kids is a lesson in patience and delight. Measuring teaches numbers. Stirring teaches rhythm. Waiting for the bars to cool teaches restraint. Most importantly, sharing what you made teaches generosity.
Give them small tasks. Let them crack an egg if they are ready. Let them stir the sugar into the butter. Celebrate each small success. These moments are the kind that become recipes for memory.
Conclusion
If you want more ways to explore frosted cookie bars and see other home cooks’ takes on this classic, these recipes offer helpful ideas and variations. For a richly frosted version with clear step-by-step photos, I like the gentle guidance in Frosted Sugar Cookie Bars – Sally’s Baking Addiction. If you want a soft, tender bar with a smooth frosting approach, the recipe at Soft Soft Sugar Cookie Bars with Frosting | The Vanilla Bean Blog gives lovely tips. For a smaller batch and a quick project, see the compact version at Small Batch Frosted Sugar Cookie Bars – ZagLeft. For a straightforward, homey take that reads like a friendly kitchen note, try Sugar Cookie Bars – Simple Joy. And for a simple, classic approach with a vintage feel, I turn to Sugar Cookie Bars – The Curvy Carrot.
These links are little windows into how other cooks keep this dessert alive. Try a few versions, keep what you love, and make it your own. When you do, set the pan in the middle of the table and let it work its quiet magic.